Announcement

Collapse
No announcement yet.

Replacing my o2 Sensors 97 Firebird v6 3.8l

Collapse
X
  • Filter
  • Time
  • Show
Clear All
new posts

  • Replacing my o2 Sensors 97 Firebird v6 3.8l

    Hey, I've done a lot of searching online and couldn't quite find the appropriate help I was looking for.
    One of the sites were pretty helpful...
    http://www.partsource.ca/doityoursel...gen-Sensor.asp
    However, it's not very model specific, but I did some searching under my car and I think I found what I'm looking for...

    My mechanic shop was going to charge me 300+ dollars for o2 sensor parts and labor, I had to decline it, because from what I've learned, o2 sensor replacement can be a simple do it yourself job... of course, with the right tools.

    I'm a complete newb when it comes to cars, I've never done work myself, except replacing stereo and speakers, and recieving help from my father replacing the radiator.

    I need help understanding how to go about replacing my o2 sensors. I understand they're under the exhaust, and I tried finding it, but I don't know if I'm correct. Here is a picture,

    I'm sorry, that's really the best picture I could get, but I'll give you a clearer idea of what I saw. Between that, (I don't remember what it's called) there are two, what it seems like, plugs going in. Not in that part itself but beside it, they look like the o2 sensors. I tried jacking up the other side but I couldn't get under it enough to get a better picture. I hope that gives you a better idea though.

    Is there any specific tools I will need to replace them? Anti-seize, wires, ratchets, philips, do I need to cut wires, etc..

    I appreciate you reading this and look forward to a response. Thank you everybody. If you have any more questions I'll be here to answer them.

    -- http://i51.tinypic.com/zxqkhu.jpg The full size image.
  • #2
    Your 97 3.8 has a total of three oxygen sensors. One after each exhaust manifold (which can be seen from under the hodd but are removed a little easier from the bottom), those are the primary oxygen sensors that are used to read the oxygen content in the exhaust so that the computer can alter the fuel mixture accordingly. The secondary oxygen sensor is located just behind the catalytic converter under the car. This sensor is used to monitor the effectiveness of the converter. Do you happen to have a SES light lit on the dash cluster? Autozone will scan the SES light stored codes in the computer for free and that will be an indication of what sensor(s) would need to be replaced.

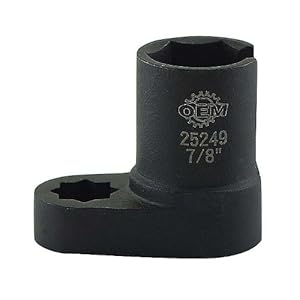
    This specialty socket is the best tool for removing an oxygen sensor, however they use a 1/2" drive ratchet, not the typical 3/8" home grade.


    The offset design really puts a good amount of additional torque on the sensor for easy removal. You should be able to get this at autozone as well. The sensors usually come with a bit of anti seize already on the threads. If not, use just a little bit and keep it off of the sensor bulb that protrudes into the exhaust stream.

    Comment


    • #3
      Thank you so much Joe. I'll head over to Autozone today after I finish up some errands and get those codes checked out, as well as the . I ordered two online which, after entering make, model, year, and sub, says "Will Fit Both Upstream (Front) & Downstream (Rear) Positions".

      This is where I got it from, but I have not received it yet. I should today, it was ordered on the 11th after I had my crank shaft sensor replaced.

      I'll definitely check that tool out as well, I just don't want to pay for something I can do myself. As far as wiring goes, is there anything I would need to do? Or is it more of a "plug-n-play" sort of deal.

      Comment


      • #4
        Originally posted by 97fbird
        Thank you so much Joe. I'll head over to Autozone today after I finish up some errands and get those codes checked out, as well as the . I ordered two online which, after entering make, model, year, and sub, says "Will Fit Both Upstream (Front) & Downstream (Rear) Positions".

        This is where I got it from, but I have not received it yet. I should today, it was ordered on the 11th after I had my crank shaft sensor replaced.

        I'll definitely check that tool out as well, I just don't want to pay for something I can do myself. As far as wiring goes, is there anything I would need to do? Or is it more of a "plug-n-play" sort of deal.
        All you normally do is unclip the wire harness, unscrew the sensor and the install is the reverse. However...... the link you showed me is a universal type sensor without the harness end. it will require that you cut off the old harness connector and splice the wires. Normally I would not recommend those. In this case, since you already ordered it I will fill you in on what to do. Unclip the old harness and remove the sensor. Cut the harness connector off and leave about an inch of wire from the connector. Strip about 1/4" of insulation back on both the sensor and the harness connector and use the included crimp connectors to splice them together. Make sure you do mot change the wire order and DO NOT shorten the wires going to the sensor. Now screw the new sensor in place and hook up the harness.

        as far as the tool, there is a 90-% chance that you will need it. It is a special hardened socket with one side open to allow the wires of the sensor to be routed outside the socket and not be pinched. Rarely can you ever break loose an oxygen sensor with a regular wrench. This is a handy tool that every backyard mechanic should have in his tool chest.

        although this picture is for a Z28 with a V8, the primary oxygen sensors are located in the same place.

        Comment


        • #5
          You have been more than helpful Joe and I really appreciate that.
          So I headed over to Auto Zone and I asked them about the tool to see if they can point me to it. They gave me two options, use their little tool box that contains a couple of those types of sockets, for $25, and within 90 days just bring it back and they'll give me my money back, or just buy one that they have in stock. I told them I didn't receive my o2 sensors yet but I'll definitely come to get it when I do. I then asked if they can use their scanner for my SES light. Since someone else was using it at the moment I had to wait a few minutes, I look around the store and I find the exact picture that you showed me, for $10. I can just get that and keep it with me as a handy tool, like you mentioned.

          While looking around the store I also noticed some handy tire pumps that require the cigarette lighter, so I was thinking about buying it since it was also just $10. Now, my cigarette lighter, since I got the Firebird, never worked. No idea what was wrong with it, and didn't really see the need to find out what was wrong with it either, but the idea of being able to charge my phone or service my car w/ the tire pump felt necessary if it ever came down to it. When they finally attempted to check my service engine light, their scanner never came on, and I mentioned my cig lighter to them. They said it's most likely a blown fuse, which is why their scanner may not be turning on. So they check my fuse box, noticed I had a 15 in a 25 slot. They replace my 15 with the right 25, and as SOON as it touches, it sparks, crackles, and blows the fuse.

          They check my cigarette lighter, I believe there's two of them, not identical, but I can't quite identify the other one in front of the emergency brake handle. Anyways, they looked to see if there was a penny in there, or anything else that could cause it. Nada. I now have a short in my system and I do not know which o2 sensors are bad.

          My local mechanic shop was able to scan my service engine light the first time I took it there, and they said the front and rear o2 sensors were bad, never really mentioned a third one, so I guess I would have to just try it out then?

          And, concerning the instructions, it's kind of like installing a stereo. For example, you have to match the right colored wires and crimp them, is that correct?

          Comment


          • #6
            I would strongly recommend you get the correct AC Delco/Delphi O2 sensors for your car, with the correct harness connectors. The connector on the front two pre-cat sensors is different than the one in the after-cat position. You are just adding an unecessary complication with having to cut and crimp the wires, and hoping you do it right. If you haven't done anything like this before, this isn't the best place to learn.

            Many people seem to have problems with aftermarket sensors. A lot of people opt for the Bosch sensors, and then have problems. Not sure why the AC Delco parts work better, but after reading these forums for 13 years, I've seen very few complaints about the AC Delco O2 sensors. Can't say that for other brands.

            Something to keep in mind with the O2 sensors. The after-cat sensor will set a code if the catalytic converter is not functioning. If that's the code you got, it could be a faulty cat, and not a faulty O2 sensor. That sensor will not affect the way the engine runs.

            According to your Owner's Manual, the fuse that you reported blown is for the cigarette lighter, ALDL connector and the auxiliary accessory wire. You need to check the wiring to each of those devices.
            Fred

            381ci all-forged stroker - 10.8:1 - CNC LT4 heads/intake - CC solid roller - MoTeC engine management - 8 LS1 coils - 58mm TB - 78# injectors - 300-shot dry nitrous - TH400 - Gear Vendor O/D - Strange 12-bolt - 4.11's - AS&M headers - duals - Corbeau seat - AutoMeter gauges - roll bar - Spohn suspension - QA1 shocks - a few other odds 'n ends. 800HP/800lb-ft at the flywheel, on a 300-shot. 11.5 @ 117MPH straight motor

            Comment


            • #7
              Thank you Injuneer,
              I have to stop by Autozone today anyway to get the tool that Joe recommended.
              I just recieved my o2 sensors today, and here is a picture of how it came in the package,

              I'm going to try and get them to run the scanner again. I don't think the wiring in my system going bad will affect how the scanner runs while connected to the console. My mechanic was able to scan the system just fine when I brought it to the shop, then again Autozone is using the pocket scanner.
              My uncle, who is also a mechanic, is coming up tomorrow and we're going to see if we can find those AC Delco parts or if we can work together on installing the sensors. I looked at Autozone and they only have Bosch. Advance Auto Parts also doesn't carry it unfortunately. There is only one Delphi though. I'll update on what is going on, I'm heading to Autozone right now. Thank you for your help!

              Comment


              • #8
                I don't know what your electrical problem is, and you should start with fixing that first, so you can scan your car and make sure that you really need O2 sensors before just throwing parts at a problem.

                That said, the sensor socket is a nice tool to have if you work on a lot of cars. I do lots of my own work, and the last time I replaced an O2 sensor was 5 or 6 years ago. If you have one that you know is bad, you can just cut the wires and use a typical deep well 8-point socket. Impact sockets work even better. They are easiest to remove when hot- run the car, shut it off, and wrench, or use a real (acetylene) torch. +1 on using the correct AC/Delco part with matching wire harness- not an environment where you want to use crimps and splices.

                I don't know if you are clear on this, but the 2 sensors on the exhaust manifolds control the fuel mix, the computer uses them to adjust the fuel injection. The one beyond the cat just measures catalyst performance on the OBDII engines, to show if the cat is working. Not necessary for smooth running, but, in some states, required to pass exhaust inspection.
                2001 Z28 A4 - 160 deg t-stat, 3.42 gears, WS6 sway bars, rear springs and shocks, UMI SFC's, Torque Arm and STB, leather Firebird seats, Borla, SLP Y-pipe and lid, ZO6 cam and springs - 332 RWHP and 346 RWTQ, not bad for 'almost stock' - work in progress
                "Black, the fastest color"

                Comment


                • #9
                  off topic but some of you might find this interesting.

                  I m pretty sure that my 97 v6 camaro that was made for the japanese market has 4 o2 sensors, one in front of the cat and one after the cat. also has a temperature sensor in or after the cat and a light on the dash. I think it warns when the cat gets too hot (faulty cat). I have removed the cat though and no ses light.
                  The car also has all the warning stickers in english and japanese too with the gm logo on them, weird mirrors that fold, and the rear side markers in the bumper didnt have light bulbs in them, were only reflective. turn signals in the front fenders. the speedo and odometer is kms, top speed seems limited to 200 kph. Its a 30th anniversary car, with cloth seats, a4 with 2nd gear start, electric seats and mirrors and the monsoon stereo. weird thing the steering wheel and shifter and handbrake are not leather. can post pictures if anyone is interested

                  I managed to take the rear o2 s off with a large adjustable spanner, in case you dont get the special socket. and I would go for the delco sensors too , because the connectors and wiring get hot all the time , water and dirt gets on them too and might damage over time the crimp on connectors.. maybe solder the wires to the old connector if you use the universal type o2s, and use some heat resistant insulating tape or something like that.
                  93 t/a A4 3.23s
                  95 Formula A4 2.73s >>>>93 t/a 3.23 , !AIR, !cat, !A/C, hotchkis lowering springs, kyb adj shocks, DD
                  99 Camaro z28 a4, 2.73, !AIR, !A/C
                  99 Alfa Romeo 166 3.0 v6, red
                  97 3.8 v6 A4 camaro, hardtop
                  93 Camaro Z28 M6, hotcam kit, 150 shot, twin plate clutch, eibach pro kit and bilstein shocks, swaybars etc
                  00 audi a6 4.2 40 valve v8

                  Comment


                  • #10
                    Hold on to your folding mirrors- they were often called "Euro mirrors" and are pretty valuable- you might find the stock ones aftermarket, but those folding ones are near impossible to come by. I think the European cars had a foglight in the rear, red, of course, that came on when the fog lights were operated. And, as you mentioned, the turn signals on the front fender.

                    I think the leather on the wheel and shifter was a particular package, an RPO code, my car lists code NP5 as steering wheel, leather wrapped.

                    oh, and your top speed may be limited to whatever tires came on your car from the factory, my Z was limited to like 108 or 112 MPH- I found out when I swapped the back axle from 2.73 to a 3.42 from a 6-speed. Hit the speed limiter, at an indicated 108, which was maybe 85 actual MPH. That can easily be programmed out.
                    2001 Z28 A4 - 160 deg t-stat, 3.42 gears, WS6 sway bars, rear springs and shocks, UMI SFC's, Torque Arm and STB, leather Firebird seats, Borla, SLP Y-pipe and lid, ZO6 cam and springs - 332 RWHP and 346 RWTQ, not bad for 'almost stock' - work in progress
                    "Black, the fastest color"

                    Comment

                    Working...
                    X